RECORD YOURSELF
This is a how-to guide for recording yourself telling a story for RISK! It is primarily for recording audio meant to be used on the podcast. If you’re instead making a 2–5-minute pitch recording to tell a full-length story on RISK!, you needn’t bother with much of this. Just make sure your recording is loud and clear and send it to pitches@risk-show.com, following all the guidelines here.
The Short Version
Very basic instructions on making a decent recording at home:
- Go into a quiet and echo-free space, and record with either:
- Voice Recorder on Android, at 44 kHz, as a WAV (good),
- Voice Memos on iPhone, set to “Lossless” (better),
- or on a computer with something like GarageBand or Audacity, saving as WAV (best).
- Position the microphone about 8 inches away and above the airstream of your breath (unless your mic has a pop filter)
- Make a test recording before you attempt your real recording. Check it yourself (in headphones) or send it (along with a description of your setup and device) to john@risk-show.com to check for you.
- Record your story and send it to kevin@risk-show.com, pitches@risk-show.com, and/or john@risk-show.com, as needed.
The Full Version
Your environment:
Location: Find the quietest room you can, moving away from windows or wherever possible noise may come from. If there is a noise coming from a certain direction, it’s generally better to face that noise rather than put it behind you.
Soundproofing: If your chosen room is pretty quiet, you may not need further soundproofing. But if you need to keep outside sounds from coming in, density is key. Prop up a mattress against a window. Drape heavy blankets over a coat rack. The thicker and heavier the materials are, the better.
Reflections: Even the quietest room can make for an awful recording if it’s too echoey. Soundwaves from your voice reflect off of hard, flat surfaces, so the more stuff there is in a room, the better. The fewer unbroken expanses of drywall your voice has to bounce off of (especially in areas that are at head-level) the better. So distance yourself from those walls if possible. That goes for the ceiling, too! If you have the option of a room with higher ceilings, try it out.
Unconscious noises: If you’re in a room you’re very accustomed to, it can be easy to get used to sounds already coming from sources in your room. Close your eyes and listen. Is there a fan blowing? A fridge running? A fluorescent light humming? Disable these temporarily while you record. Also, think about what nonverbal sounds you might make while you record your story, like rubbing your leg, clicking a pen, tapping on a desk or jangling bracelets while gesticulating. Take whatever measures you can to eliminate these things.
A tried and true trick for getting a quiet and echo-free recording is is to sit in a parked car on a quiet street. There’s usually no echo, and the car keeps most of the outside noise from coming in.
Another is simply throwing a heavy comforter over your head. The main side effect (besides overheating!) can be producing a muffled tone, so give yourself a bit of space under there. But try it out if necessary.
And another option is to tuck yourself into a closet full of clothes and whatever else is already in there. It may not be comfortable, but it gets the job done. It is especially important to make a test recording of this method first, as it can sometimes lead to a “boxy” sound.
Recording on a tablet or smartphone:
Whatever your device, you will likely have better results using the microphone built into your smartphone than using the mic built into EarPods or Airpods. This isn’t always true, but it usually is.
You can record right into the built-in Voice Memos app, but first….
Settings: If you have the room to spare on your phone (you’ll need around 50 MB for a 30-minute recording), go to Settings > Voice Memos > Audio Quality > select “Lossless.”
Tip: In most cases, recording directly into an iPhone’s built-in mic sounds better than anything external you might plug into it, such as a lavalier mic.
There is not always a native audio recorder in Android phones. But there are plenty of free apps available in Google Play. You want one that allows you to record in a “lossless” format such as WAV or PCM or FLAC. One we can recommend is this one called Voice Recorder.
Settings: Download Voice Recorder, then tap the settings icon.

Select “Record file type,” then select .WAV
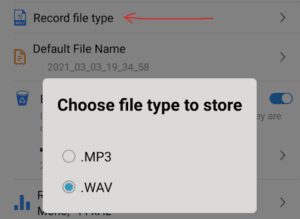
Then select Recording Quality and make sure it’s set to “MONO – 44 kHz”

- Position your phone so the microphone is approximately 8 inches from your mouth.
- If you can, it’s better to place your phone down on something rather than hold it in your hand where it may pick up handling noise.
- Speak slightly below or at an angle into the microphone, so it’s out of the direct airstream of your breath. It may look silly, but try positioning the phone flat and pointing the mic toward your nose. Holding it off the side, at a 45° angle, will also help keep you breath from going directly into the microphone.
Recording on a computer or portable recorder:
Email john@risk-show.com if you’d like help optimizing your setup. But here are some general tips:
- Record with a program like GarageBand or Audacity or Adobe Audition. Do not record with a program like Zoom or Skype.
- Do not record with any effects (compression, EQ, etc.) engaged. And do not apply any effects afterward either. Leave it all raw, unedited, and unmodified.
- Record at 16-bit at least (but 24 or higher is better).
- Record at no less than 44.1kHz sample rate.
- Record as a WAV or AIFF or FLAC. (If it has to be an MP3 or similar “lossy” file, set it to 320kbps.)
- Microphone placement: Whether you are recording into a microphone built into your computer or using an external microphone of some sort, it’s best to position it as close to your mouth as you reasonably can. However, avoid breathing straight into the microphone, especially if you aren’t using a pop filter or windscreen of some sort. Simply direct the stream of your breath away from the microphone.
Before you record your story:
Before you pour everything you’ve got into telling your story, make some test recordings. See how it sounds. Is there too much noise? Are you too close and breathing into the microphone? Are you too far away and sound distant? If you want us to have a listen and tell you how it sounds, email your test file to john@risk-show.com along with some explanation of what your setup is, and he’ll get you some feedback before you record for real.
Recording your story:
- Hit Record and let it roll silently for at least 5 seconds.
- Tell your story. If you ever catch yourself stumbling over your words, just pause, take a breath, back up a bit, and resume telling your story. We can edit that it out later.
- If you find you need to shout something, pull back so you don’t overwhelm the microphone, and move back in when you’re at a more medium volume.
- Likewise, if you need to whisper something, lean in a bit.
- When you’re done, let the recording roll for another 5 seconds or so before stopping.
Bonus for short stories: Record your story twice in a row! This can be way more helpful than you’d think.
Editing your story:
- Don’t! See #2 above. Do not go back afterward and edit your recording in any way. Leave that to us. We’re really good at that, and it can be very difficult for us to undo a shoddy edit.
Sending your story:
- Rename your file to include your own name, so we know who it’s from.
- If the file is small enough, simply email it to pitches@risk-show.com (or to Kevin or John if that’s who’s expecting it, of course!)
- If it’s too large, you can put it in Google Drive, or WeTranfer, Dropbox or any other free file upload service like that, then send us a link.
- If you’re uploading a 2–5-minute pitch recording, be sure to alert us at pitches@risk-show.com.